Updated setup instructions available here.
This integration allows PowerSchool general education staff to seamlessly view student documents in SameGoal while logged into PowerSchool.
This integration:
- Displays an alert in PowerSchool when the student has a complete, currently effective program document (based on start and end dates) in SameGoal.
- When this alert is clicked, it displays documentation, including attachments, authored in SameGoal.
Alerts may be configured to display in a variety of areas throughout PowerSchool. By following the steps below, alerts will appear on the following PowerSchool pages:
- Power Admin: Alerts appear at the top of each student page (e.g. Quick Lookup, Student Attachments, etc.)
- Power Teacher: Alerts appear at the top of each student page (e.g. Quick Lookup, Schedule, and any other student page you add them to). For example, visit a class, select a student, then view the student's schedule.
- Parent Portal: Alerts may also be added at the district's option to the parent portal.
Steps
To setup alerts & document viewer integration with PowerSchool:- Create Alert_SG field
- Add Alert_SG to students custom page
- Add wildcard student alert
- Add alert to teacher pages
- Install FRN custom page
- Update samegoal group permissions
- Install SameGoal SSO plugin
- Add PowerSchool SSO URL to SameGoal
- Test
lightbulb Tip
You will need access to a PowerSchool Administrator and PowerSchool Systems Administrator account. This integration also assumes you have already setup the
demographics integration, including adding a
samegoal account to your PowerSchool instance and creating a
samegoal group.
Login to your PowerSchool Administrator account.
- In the left menu, visit System.
- On the System Administrator page, visit Custom Fields/Screens.
- On the Custom Fields/Screens page, visit Student Fields.
- Click the New button.
- On the New Student Field page, set Field Name: Alert_SG.
- Click Submit. This single field will contain all SameGoal alerts for a given student.
Login to your PowerSchool Systems Administrator account.
- In the left menu, visit Custom Pages.
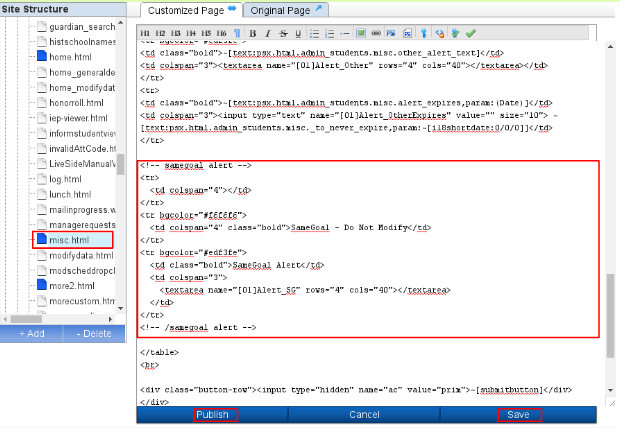
- In the Site Structure pane, expand admin then students. Select misc.html.
Add the following code to the page after the Alert_Other code (towards the bottom). Click Save, then Publish.
<!-- samegoal alert -->
<tr><td colspan="4"></td></tr>
<tr bgcolor="#f6f6f6"><td colspan="4" class="bold">SameGoal - Do Not Modify</td></tr>
<tr bgcolor="#edf3fe">
<td class="bold">SameGoal Alert</td>
<td colspan="3"><textarea name="[01]Alert_SG" rows="4" cols="40"></textarea></td>
</tr>
<!-- /samegoal alert -->
lightbulb Tip
If you are on PowerSchool Version 23.5 or higher, the Enhanced User Interface should be turned off for the SameGoal account.
Login to your PowerSchool Systems Administrator account.
- In the left menu, visit Custom Pages.
- In the Site Structure pane, expand wildcards.
- Click the +Add button at the bottom of the Site Structure pane. Choose + Create File.
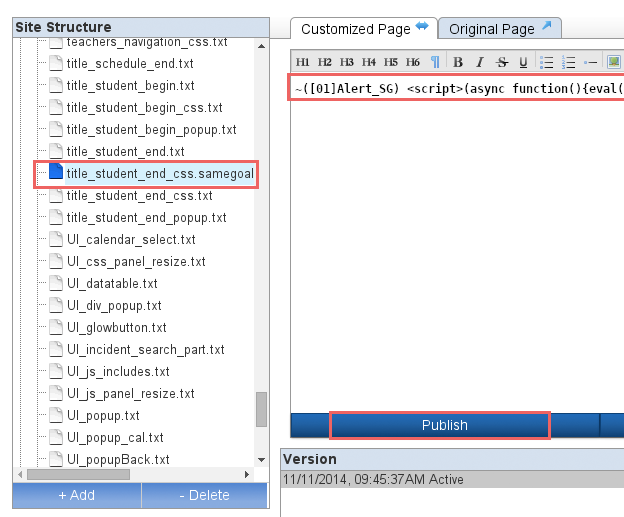
- Name the file title_student_end_css.samegoal.student.alert.txt. Click Submit.
- Select title_student_end_css.samegoal.student.alert.txt in the Site Structure pane.
- In the Customized Page pane, enter the following text. Click Save, then Publish.
~([01]Alert_SG) <script>(async function(){eval(await (await fetch('https://samegoal.com/iep/psAlert.js')).text());})();</script>
Login to your PowerSchool Systems Administrator account.
- In the left menu, visit Custom Pages.
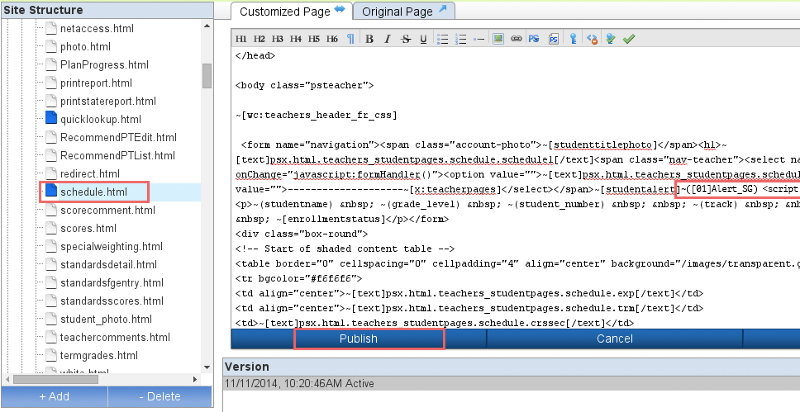
- In the Site Structure pane, expand teachers then studentpages. Select schedule.html.
- Add the following code after ~[x:teacherpages]</select></span>~[studentalert]. Then click Publish.
- Repeat for quicklookup.html.
~([01]Alert_SG) <script>(async function(){eval(await (await fetch('https://samegoal.com/iep/psAlert.js')).text());})();</script>
Download the file below: Right-click the link, choose Save as..., then save the file to a location of your choosing.
Login to your PowerSchool Systems Administrator account.
- In the left menu, visit Custom Pages.
- In the Site Structure pane, expand admin then functions.
- Click the +Add button at the bottom of the Site Structure pane. Click + Upload File.
- Click Choose File. Browse to select frn.powerschool.html. Click Submit.
- Select frn.powerschool.html in the Site Structure pane. In the Customized Page pane, click Publish.
Login to your PowerSchool Administrator account.
- In the left menu, visit System.
- On the System Administrator page, visit Security.
- Visit Access to Page Permissions.
- In the Turn modify permissions dropdown, select On. Click Submit.
- You will be redirected to the Security page.
- Modify your URL bar to visit: https://[your-powerschool-host]/admin/functions/frn.powerschool.html
- Scroll to the bottom.
- Click the Modify access privileges for this page link.
- Find the samegoal group and select View-only.
- Click Submit.
Login to your PowerSchool Administrator account.
- In the left menu, visit System.
- On the System Administrator page, visit Security.
- On the Security page, visit Groups.
- On the Groups page, use the filter to search for the samegoal group. Click it.
- On the Edit Group page, set
- Access Level: View & Modify
- Accessible Student Screens: check Other Information.
- Scroll to the bottom of the page and click Submit.
lightbulb Tip
If you are on PowerSchool Version 23.5 or higher, the Enhanced User Interface should be turned off for the SameGoal account.
lightbulb Tip
This step assumes you already created the
samegoal group while setting up the demographics integration. You
must increase the group permissions as indicated in this step in order for the alerts integration to operate. It relies on writing to the newly created
Alert_SG field for each student as applicable.
We would have had you set this permission during the demographics integration setup, except for the fact we want to ensure we use the minimal amount of access at each point.
Download the file below: Right-click the link, choose Save as..., then save the file to a location of your choosing.
Login to your PowerSchool Administrator account.
- In the left menu, visit System.
- On the System Administrator page, visit System Settings.
- On the System Settings page, visit Plugin Management Configuration.
- Click the Install button in the top right.
- Plugin Installation File: upload ps_samegoal_sso_plugin.xml
- Click Install. You will be redirected to the Plugin Management Dashboard page.
- Once installed, the plugin will appear under Installed Plugins.
- Click the Enable/Disable checkbox to enable the plugin.
- Choose Enable in the pane that appears.
Log in to your PowerSchool Administrator account.
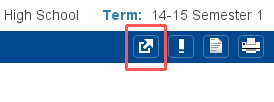
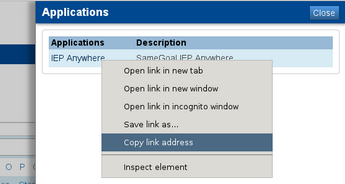
- Click the application icon located on the right side of the header bar.
- A side pane will appear. Right click SameGoal and select Copy Link Address.
lightbulb Tip
If you click the link, page shows
Illegal ctx query param. This is expected.
Log into SameGoal as an admin user and follow these steps:
- Navigate to Settings > District Information > Details.
- Under PowerSchool Demographics Integration, enter the SSO URL.
- Click the Save button.
lightbulb Tip
It may take up to 24 hours after PowerSchool information has been entered in SameGoal for the alerts integration to run.
Expected Result: After the integration has run successfully, each student that has a completed and currently effective major Special Programs document (e.g. IEP) will display a SameGoal alert in PowerSchool. Clicking it will display a read-only copy of the document.
If the integration does not succeed, verify you can login to your PowerSchool Administrator account using the Admin URL, Username and Password entered in SameGoal. If you are able to login:
- Verify you can visit the URL: https://[your-powerschool-host]/admin/functions/frn.powerschool.html
- If the page does not exist, install it. See step 5
- If the page exists but you do not have access, modify the samegoal group's permissions. See step 6
- Verify you can visit the URL: https://[your-powerschool-host]/admin/students/misc.html
- If you do not have access to the page, update the samegoal group's permissions. See step 6
- Verify you can save information in the SameGoal alert field. If not, update the samegoal group's permissions. See step 6
- Verify the SameGoal SSO plugin is installed and enabled in PowerSchool. See step 7
- Verify the SSO link entered in SameGoal is correct. See step 8
- Verify student wildcard file has been added. See step 3
- Verify teacher custom page has been updated. See step 4


![]()
